Nimble Quickstart
Prerequisites
You will need to know some basic python. A good reference is the Python Tutorial.
Additionally, it is recommended that any linear algebra-based computation use an optimised library such as NumPy or SciPy, Tensor-based operations use PyTorch, general machine algorithms use scikit-learn and image-based transformations use OpenCV.
Finally, it is recommended to configure and subscribe to Nimble via the REST and WebSocket interfaces respectively. While we provide a configuration file interface, its use is mainly for debug and experiment purposes. For a primer on REST APIs please refer here and for WebSockets here. All examples will use the REST and WebSocket APIs.
Learning Objectives
After reading this quickstart you should be able to:
- Understand what is the Nimble framework and SDK and how they operate within a container;
- Construct a Nimble configuration and deploy it on a Nimble container;
- Subscribe to real-time inference and analytics data.
The Basics
Nimble deploys inference and analytics pipelines constructed of sources, sinks and elements.
sources bring data into the pipelines, sinks take data out of pipelines, and elements are individual work items that perform some operation on the data.
elements can be designed to target multiple hardware devices; the most common example are the deep learning inference elements targets CPUs, GPUs, or ASICs.
For example, a Nimble pipeline can be constructed to read from a video feed and save it to a file. In the example illustrate below, the source is configured to stream a YouTube video to a file sink that saves it as the video file nimbletube.mp4.
- sources:
  - address: https://youtu.be/jY86pXeTOLw
    type: youtube
  sinks:
  - address: nimbletube.mp4
    type: file
Furthermore, a pipeline can be added that consists of the image-resize element that changes the output video to a specific height and width.
...
  pipeline:
  - name: image-resize
    - height: 480
    - width: 640
An Example: Connecting to Nimble
From your installation directory navigate to <nimble_path>/samples/quickstart and build the client service:
$ docker-compose build client
Once that completes will we start up the client:
$ docker-compose run client
It will open the Python Interpreter inside the container, and we can query the Nimble version by making a GET API request:
>>> import requests
>>> requests.get("http://nimble:6344/v1/about/version").json()
{'version': '4309392'} // Your version may be different depending on your release version
Under <nimble_path>/samples/quickstart you will find all the quickstart python files including utils.py which contains a number of helper functions designed to remove some boilerplate from interacting with the REST API.
While you can use the REST API to interact with Nimble via the Python Interpreter, it can become somewhat cumbersome. From here on out the examples will be contained to discrete files.
Creating a Source
The next step is to bring data into Nimble, to do this we need to define a source.
We will use the YouTube example from above.
The code block below does the following:
- loads the utils functions that come with the quickstart
- makes sure that Nimble is reachable
- defines a
sourceconfiguration - issues a
PUTrequest to API endpoint/v1/config - requests the loaded configuration from the
GETAPI endpoint/v1/config
import utils

# Wait for Nimble to be ready
utils.wait_for_nimble()

# Define the configuration we want to deploy
SOURCE_YAML = """
- sources:
  - address: https://youtu.be/jY86pXeTOLw
    type: youtube
"""

# Issue the PUT request
utils.put_yaml("/v1/config", SOURCE_YAML)

# Get the configuration from Nimble and print it
utils.pprint_yaml(utils.get("/v1/config"))
The result of the above script is shown below:
$ docker-compose run client python source.py
Creating quickstart_client_run ... done
Connected to Nimble!
Successfully executed /v1/config -- Return code: 200
pipelines:
- elements:
  - passthrough
  id: 0
  sinks:
  - 0
  sources:
  - 0
  usecase: null
sinks:
- address: 'null'
  filter: []
  id: 0
  type: inf
sources:
- address: https://youtu.be/jY86pXeTOLw
  id: 0
  rate: 30.0
  stream: 0
  type: youtube
When you request the configuration there are three main parts that you receive, the pipelines, sinks and sources.
Since a valid Nimble configuration requires at least one source, sink and pipeline (with a single element) you can see that the returned configuration has defaulted to a passthrough pipeline element, and the infinite sink.
These two elements are designed to both be no-ops (No Operation).
For details on the other fields you can refer to our element, sink and source API documentation here.
Getting data from Nimble
Now that we can push configuration to Nimble the next step is subscribe to the WebSocket and look at some data. In this example we are going to extend above configuration to encode the YouTube video as a series of JPEGs. We will subscribe to the metadata WebSocket, extract the encoded JPEG, decode it back to a numpy array and display the size.
Since WebSockets are an event-based protocol we need to make some modifications to the application to support running it as a coroutine.
To do this we will leverage the asyncio python package, for more details on how asyncio works please refer to this tutorial.
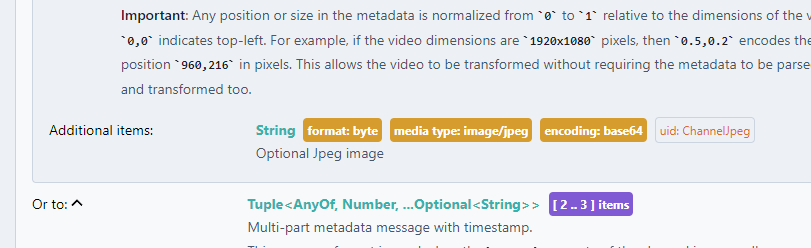
Before getting started it's good to look at the metadata WebSocket endpoint to get an idea of what we need to do.
Drilling down into the "subscribe" payload we can see that in the additional items sections it returns a JPEG in byte format with base64 encoding.
This is displayed below:
With this in hand we are ready to create our first WebSocket application.
First we import all the relevant packages, we then wait for Nimble to be become available, and set up our YAML definition.
Different from our previous example we have included a pipeline in our YAML and specified the image-encoder pipeline element.
This is highlighted below:
import utils
import asyncio
import websockets
import json
import numpy as np
import cv2
import base64
from simplejpeg import decode_jpeg

# Wait for Nimble to be ready
utils.wait_for_nimble()

# Define the configuration we want to deploy
SOURCE_YAML = """
- sources:
  - address: https://youtu.be/jY86pXeTOLw
    type: youtube
  pipeline:
    - image-encoder
"""
For additional details on the image-encoder pipeline element you can refer to the Nimble API documentation here.
Next we create a async function that will subscribe to Nimble's metadata WebSocket and await for the first blob of metadata.
Since the metadata is transmitted as a JSON string we will use the json.loads method to convert it to a python dict.
# Create a websocket connection to Nimble
# and return one frame of metadata
async def metadata_notify():
    async with websockets.connect('ws://nimble:6344/v1/exports/channels/metadata') as websocket:
        return json.loads(await websocket.recv())
Next the main function of the application.
We first load the configuration using the API endpoint /v1/config as shown in the previous example.
We then await for the metadata_notify() function to return the metadata.
Finally, we will extract out the byte array of the JPEG image, perform the base64 decode, then decode the JPEG to extract the numpy array and display the shape.
# Since we interact with Nimble via websockets,
# we need to start using coroutines and asyncio
async def main():
    # Load the Nimble configuration
    utils.put_yaml("/v1/config", SOURCE_YAML)

    # Get one frame of metadata
    # Our metadata will be returned as a list:
    # [channel_id, analysis_data, frame_timestamp, base64_encoded_jpeg]
    metadata = await metadata_notify()

    # Decode the jpeg image
    jpeg_data = base64.b64decode(metadata[3])
    img = decode_jpeg(jpeg_data)

    # Display the shape of the frame
    print(img.shape)

asyncio.run(main())
This example can be found at <nimble_path>/samples/quickstart/jpeg.py and can be run as shown below:
$ docker-compose run client python jpeg.py
Creating quickstart_client_run ... done
Connected to Nimble!
Successfully executed /v1/config -- Return code: 200
(360, 640, 3)
At this stage we have been able to connect to Nimble, push configuration via the REST API and subscribe to metadata notifications via WebSockets.
The next examples will cover adding an inference element to the pipeline and extracting out the inference metadata.
While we subscribed to a JPEG stream to extract out the frames from the source, Nimble offers an advanced transcoding solution which outputs the source as a Fragmented MP4 Byte Stream.
This method is significantly more compute efficient and is the recommended method for large deployments.
You can find information on the fMP4 WebSocket endpoint here.
Performing Inference
In this final example we will add a person detection model to our existing pipeline, receive inference results and count the number of detections.
The example file will be mostly same as the previous example, so I will only highlight the relevant changes.
Below you can see in our SOURCE_YAML we have added the highlighted line - person-detection-nano:a:0.3:0.3.
# Define the configuration we want to deploy
SOURCE_YAML = """
- sources:
  - address: https://youtu.be/jY86pXeTOLw
    type: youtube
  pipeline:
    - person-detection-nano:a:0.3:0.3
    - image-encoder
"""
This line creates a new pipeline element in Nimble that run the Megh deep learning model person-detection-nano before the image-encoder.
Metadata is passed to the elements from top to bottom.
As metadata is passed from one element to the next the metadata is modified by the elements process function.
In the case of deep learning models, their inference results are appended to the metadata.
The next code block highlights the code for iterating through the different labels (l) and prints the name (n) and the number of instances (i) of that detection.
    # Display the shape of the frame
    print(img.shape)

    # Display the Number Detections per Unique Label
    for label in metadata[1]['l']:
        print(f"{label['n']}: {len(label['i'])}")

asyncio.run(main())
This example can be found at <nimble_path>/samples/quickstart/inference.py and can be run as shown below:
$ docker-compose run client python inference.py
Creating quickstart_client_run ... done
Connected to Nimble!
Successfully executed /v1/config -- Return code: 200
(360, 640, 3)
person: 41
This concludes the Nimble quickstart, please read on for an in-depth overview of how Nimble configures pipelines for optimal resource allocation.
The VAS SDK comes the Megh Model Zoo, there are a number of reference networks which will be familiar as well as a number of Megh trained and optimised models for surveillance use-cases, you can find more details here. Try changing the model to something else and see what else can be detected.